The Salt Volcano Experiment is a simple, hands-on science activity that uses household ingredients to create a dramatic, fizzy eruption inside a clear jar or glass. This experiment visually demonstrates density differences between liquids and provides an excellent introduction to basic chemistry and physics concepts for kids and adults alike.
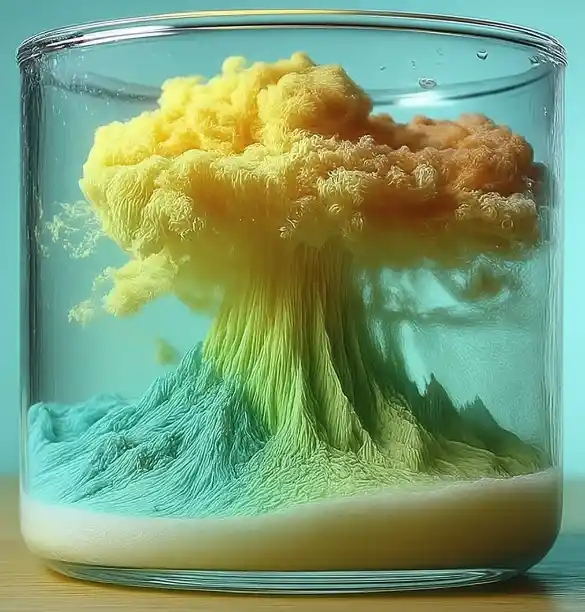
Why it’s a standout experiment:
- It uses basic kitchen items
- It’s safe and kid-friendly
- It’s reusable with varied outcomes
- It explains real-world science in an exciting way
Why You’ll Love This Experiment
The Salt Volcano Experiment is more than a science demonstration. It’s an immersive experience that helps children engage with science on a sensory level. With its bubbling reaction and colorful display, it makes abstract scientific principles feel tangible and fun.
Grab This Chef Knife Now - Almost Gone!
Here’s why readers will enjoy it:
- It’s easy to set up with everyday materials
- It delivers fast, exciting visual results
- It encourages kids to ask questions and explore
- It’s ideal for science lessons, homeschooling, or just fun at home
Preparation Phase and Tools to Use
Ingredients Required
To conduct the Salt Volcano Experiment, gather the following ingredients:
- 1 cup room temperature water
- ¼ cup vegetable oil
- 1–2 tablespoons salt (rock salt, sea salt, or table salt)
- Optional: food coloring for enhanced visuals
- 1 clear glass or jar
Essential Tools and Equipment
- Measuring cup for liquids
- Measuring spoon for salt
- Spoon or stirrer (optional)
- Flashlight (optional for visibility enhancement)
- Dropper or pipette (for adding food coloring)
Importance of Each Tool
Each component plays a critical role in both the scientific outcome and visual appeal of the experiment:
- Clear glass or jar: Allows observation of layer separation and reaction
- Vegetable oil: Demonstrates the concept of liquid density
- Salt: Acts as the catalyst that triggers the bubbling eruption
- Water: Provides a medium for the eruption to occur
- Food coloring: Adds a colorful dimension and helps visualize the process
- Flashlight: Enhances visibility, especially in low-light environments
Preparation Tips
- Use room temperature water to minimize condensation and allow better visibility
- Select a tall, transparent jar or glass for optimal viewing angles
- Place a towel or tray beneath the jar to catch any overflow
- Test various salts—like kosher, sea salt, or table salt—for reaction differences
- Set the experiment on a flat, stable surface
Step-by-Step Directions
1. Fill the Jar
Pour 1 cup of water into a clean, clear jar or glass.
2. Add the Oil
Slowly pour ¼ cup of vegetable oil on top of the water. Wait a few seconds and observe how the oil floats above the water, demonstrating a key scientific principle: density.
3. Add Color (Optional)
If you choose to use food coloring, drop 2–3 drops through the oil. You’ll notice the coloring passes through the oil layer and mixes with the water beneath. This step adds visual clarity and color to the final eruption.
4. Create the Eruption
Sprinkle 1–2 tablespoons of salt into the jar. Watch as the salt sinks, pulling some oil along with it. As the salt dissolves in the water, it releases the oil, which rises back to the surface in bubbly, fizzy patterns—just like a mini volcanic eruption.
5. Repeat the Reaction
Continue adding small amounts of salt to trigger repeated eruptions. Each addition initiates the same lifting and bubbling reaction, offering several minutes of visual engagement.
Pro Tips and Creative Variations
- Use a flashlight or phone light behind the jar in a dark room to create a glowing eruption effect
- Try layering multiple food coloring shades for a rainbow eruption
- Test different types of salt to compare eruption speed and bubble size
- Use a larger container for a more dramatic effect
Creative Ways to Present the Experiment
The Salt Volcano Experiment can be a captivating visual centerpiece for a variety of learning and entertainment settings. Whether you’re using it in a classroom, a homeschool session, or as an at-home activity, you can enhance its impact by presenting it in creative and interactive ways.
Presentation ideas include:
- Use it as a live demonstration in a science lesson to illustrate density and solubility
- Set it up during a science-themed birthday party or family event
- Record the reaction with a slow-motion camera or smartphone to review and study the process
- Pair it with a worksheet or quiz to turn it into a full educational activity
- Use blacklights or glow-in-the-dark coloring to create a night-time science show
Common Mistakes to Avoid
Even though the experiment is simple, small mistakes can reduce its effectiveness or cause confusion. Below are common issues and how to avoid them for the best results.
Mistake 1: Adding Salt Too Quickly
Problem: Pouring in too much salt at once can cause the oil and water layers to mix, reducing the clarity of the eruption.
Solution: Add salt slowly and in small increments to maintain separation between layers and extend the eruption effect.
Mistake 2: Using Very Cold or Hot Water
Problem: Extreme water temperatures may lead to condensation or inconsistent reactions.
Solution: Use room temperature water for the clearest visual and the most consistent result.
Mistake 3: Not Allowing Layers to Settle
Problem: If oil and water are agitated before adding the salt, it can take longer for the layers to separate again.
Solution: Wait 30 to 60 seconds after adding the oil to let the two liquids settle fully before continuing.
Mistake 4: Shaking the Jar
Problem: Shaking causes emulsification, which may prevent the salt and oil from reacting correctly.
Solution: Keep the jar steady throughout the experiment and avoid disturbing the layers.
Mistake 5: Using Cloudy or Dirty Containers
Problem: Impurities or residue in the container can interfere with the visual clarity of the eruption.
Solution: Use a clean, transparent glass or jar for optimal visibility.
How to Perfect the Experiment
To elevate the Salt Volcano Experiment and make each repetition as dramatic and educational as the first, consider applying these optimization tips.
Use Consistent Salt Measurements
Maintain a consistent salt quantity—around 1 to 2 tablespoons per eruption. Too little may result in a weak reaction; too much can overwhelm the system.
Allow Full Settling Between Additions
Wait until the oil has floated back to the top and the bubbles have cleared before adding more salt. This allows each round to be distinct and clearly visible.
Explore Ingredient Variations
Test the experiment with different types of oil (such as olive or baby oil), or different salts (table salt, sea salt, kosher salt) to explore how solubility and grain size affect the eruption.
Combine Learning with Observation
Encourage kids to take notes, draw what they see, or answer questions about why the reaction occurs. Turn the experiment into a mini science lab session.
Side Activity Recommendations
Enhance the Salt Volcano Experiment with additional science-based activities that offer variety and reinforce key scientific concepts. These complementary experiments act as “side dishes” that deepen understanding and broaden exploration.
1. Baking Soda and Vinegar Volcano
A classic acid-base reaction that produces a foamy eruption, perfect for teaching chemical reactions.
2. Homemade Lava Lamp with Alka-Seltzer
Similar to the salt volcano, this activity combines water, oil, and fizzing tablets to create bubbling movement.
3. Magic Milk Science Experiment
Uses dish soap and food coloring to show surface tension and molecular interaction in a colorful display.
4. Skittles Rainbow Experiment
Arranges candy in a circular pattern to dissolve into vibrant, symmetrical rainbows.
5. Dancing Raisins
Demonstrates buoyancy and carbonation by observing how raisins rise and fall in soda.
6. Oobleck Slime (Non-Newtonian Fluid)
Teaches the properties of materials that behave like both a solid and a liquid depending on force applied.
7. Lemon Volcano
Combines citrus and baking soda for a foamy, acidic reaction that visually resembles lava.
8. Invisible Ink with Lemon Juice
A chemistry-based experiment that uses oxidation to reveal hidden messages under heat.
Storage and Reuse Instructions
The Salt Volcano Experiment is simple to reset and reuse multiple times, making it ideal for repeated demonstrations.
How to Store the Setup
- If you plan to use the same jar again, cover it with a lid or plastic wrap and store it at room temperature
- Avoid refrigeration, as temperature changes can alter the layering and cause condensation
- Keep the jar in a dry, undisturbed place between uses
Reusing the Mixture
- You can repeat the eruption by adding new salt at intervals
- After 2–3 rounds, the mixture may become cloudy or layered unevenly
- Once the visual clarity diminishes or if odors develop, discard and start fresh
Cleaning Up
- Pour contents into the trash or compost bin—avoid pouring oil down the drain
- Rinse the jar with warm, soapy water to remove any oil residue
- Let the jar dry completely before storing or reusing
Expert Tips for Better Results
To get the most from this experiment and extend its educational value, apply these proven strategies.
Use a Tall, Narrow Jar
A tall jar allows for more visible separation between oil and water layers, and makes the eruption easier to observe.
Combine Color and Light
Use food coloring to differentiate layers and a flashlight behind the jar to illuminate the eruption in dark rooms.
Try Different Salt Types
- Table salt causes fast, small eruptions
- Kosher salt creates slower, larger bubbles
- Rock salt produces delayed but intense reactions
Guide Observation and Discussion
Encourage students or children to:
- Predict what will happen before each step
- Draw what they see after the eruption
- Describe why they think the oil rises back up
Turn It Into a Full Science Lesson
Introduce key concepts:
- Density: Why oil floats on water
- Solubility: How salt dissolves
- Buoyancy: Why the oil blobs rise
Provide simple definitions and examples to connect the experiment with real-world phenomena.
Frequently Asked Questions (FAQs)
Here are the most commonly searched questions and answers related to the Salt Volcano Experiment.
What makes the Salt Volcano erupt?
When salt is added, it sinks through the oil into the water, pulling oil down with it. As the salt dissolves, the trapped oil rises back to the surface, creating an eruption effect.
Can I use other types of oil?
Yes. Vegetable oil works best, but you can also try canola oil, baby oil, or olive oil. The results may vary slightly in speed and bubble size.
Why does the oil float on top of the water?
Oil is less dense than water, so it naturally floats on top. This difference in density is crucial for the experiment to work.
How long does the eruption last?
Each eruption lasts a few seconds to a minute, depending on the amount and type of salt used. You can repeat the eruption by adding more salt.
Can I use sugar instead of salt?
No. Sugar is not dense enough to carry the oil downward. Salt’s density and solubility make it essential for the reaction.
Conclusion: Transforming Simple Ingredients into Science
The Salt Volcano Experiment is more than just a colorful, fizzy reaction—it’s a gateway to scientific discovery. Using basic household materials, you can demonstrate powerful concepts like density, solubility, and buoyancy in a format that captivates and educates.
This activity is perfect for classrooms, homeschooling environments, science fairs, or family fun. It’s clean, easy to repeat, and endlessly adaptable with variations like colored salts, different oils, or even lighting effects.
Encouraging observation, questioning, and critical thinking, this experiment brings science to life in a meaningful, hands-on way. The next time you’re looking for a creative and educational activity, reach for salt, oil, and water—and let the science erupt.
After finishing your science fun, treat yourself with these gooey Peanut Butter S’mores Sandwich Cookies—a perfect reward for curious minds!
Salt Volcano Experiment
Create a stunning, fizzy eruption in a jar using water, oil, and salt! A fun and simple science activity that visually demonstrates density and chemical interactions.
- 1 cup room temperature water
- ¼ cup vegetable oil
- 1 to 2 tablespoons salt (rock salt or table salt)
- food coloring (optional, for visual effect)
- 1 clear glass or jar
- Pour 1 cup of water into a clear glass or jar.
- Slowly pour in ¼ cup of vegetable oil. Wait and observe how the oil floats on top of the water.
- Add a few drops of food coloring if desired. Watch the drops pass through the oil and mix into the water.
- Carefully sprinkle 1–2 tablespoons of salt into the jar.
- Observe the fizzy eruption as salt sinks and carries oil blobs downward, which then rise back up.
- Repeat by adding more salt in small amounts to continue the eruption effect.
Use a flashlight behind the jar in a dark room to enhance the visual effect. Try different types of salt (like kosher or sea salt) to observe variations in the eruption. Great for kids’ science experiments or classroom demonstrations.
Thousands of Happy Customers Can't Be Wrong About These Bowls!

Leave a Comment